
DIY Home Mold Inspection: A Complete Canadian Homeowner’s Guide
Most Canadian homeowners can run a meaningful DIY mold inspection in an afternoon with under $100 of gear. What you cannot DIY is the species lab work, the air-sample chain of custody, or the documentation that holds up in insurance and real estate transactions. This guide walks you through both halves of the decision: when a thorough DIY pass is the right call, when to stop and pick up the phone, and exactly how to do each step properly.
When DIY Mold Inspection Makes Sense (vs Calling a Professional)
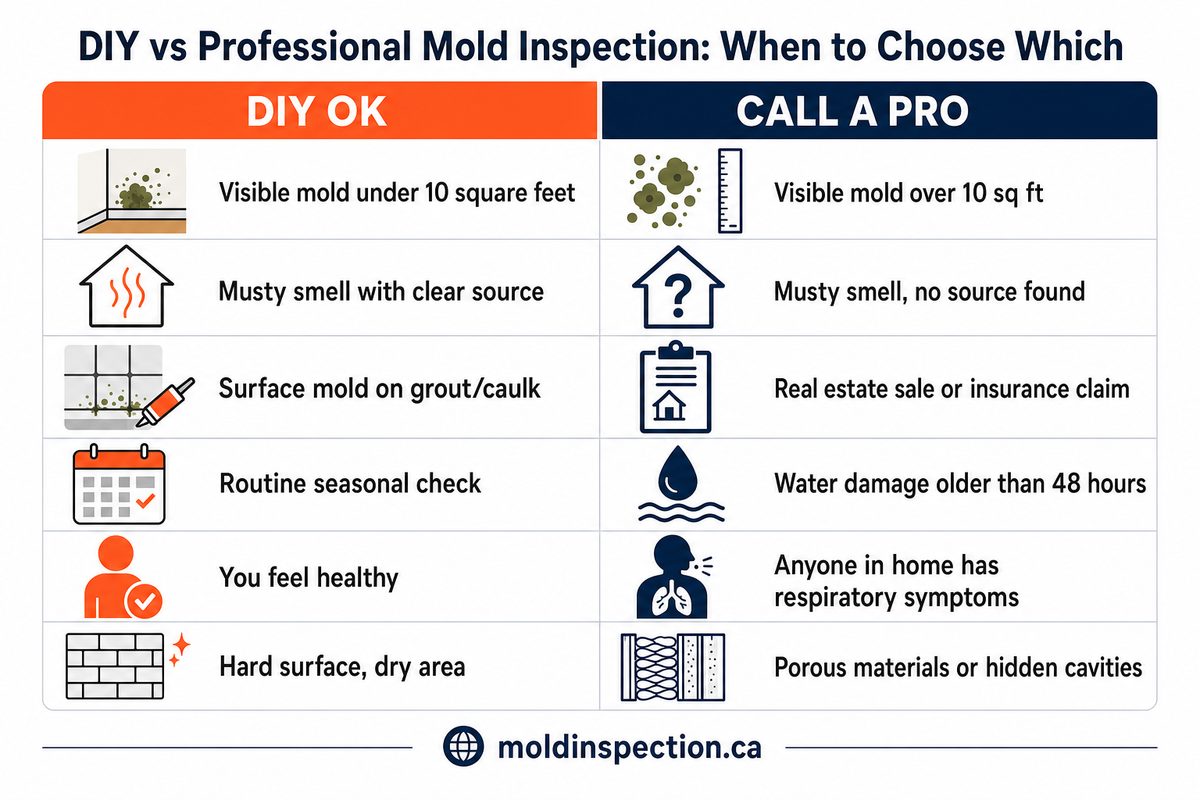
DIY makes sense for triage and small visible-mold situations. Professional inspection makes sense the moment money, health, or legal exposure enters the picture. The split is not about your skill; it is about what the report needs to do downstream.
DIY is the right call when
- You can see the mold and it is under ten square feet
- The musty smell has an obvious source you have already found
- You are doing a routine seasonal check after winter
- The surface is non-porous (tile, glass, sealed wood, plastic)
- You feel healthy and no one in the house has a respiratory condition
- You want a sanity check before deciding whether to call out
- You are scoping a future renovation and want to flag damp areas
Call a professional when
- Visible mold covers more than ten square feet (Health Canada threshold)
- There is a musty smell with no visible source
- You are buying, selling, or refinancing a home
- You are filing an insurance claim or a Section 30 LTB application
- Water damage is older than 48 hours or affects drywall, insulation, or subfloor
- Anyone in the home has asthma, allergies, or is immunocompromised
- You suspect mold inside walls, HVAC ductwork, or a crawl space
- A previous DIY remediation was attempted and the mold came back
The boundary is not arbitrary. Health Canada’s Residential Indoor Air Quality Guideline for Moulds classifies contamination as small (under one square metre, roughly ten square feet), medium (one to three square metres), and extensive (over three square metres). Small areas are explicitly within homeowner scope. Medium and extensive areas require trained personnel with containment and HEPA-filtered air movers. If your inspection turns up anything in the medium or extensive band, the inspection itself is no longer the question — the remediation is. Get a written report. See what mold actually is and why species rarely matters for the science behind the threshold.
What DIY Mold Inspection Costs in Canada
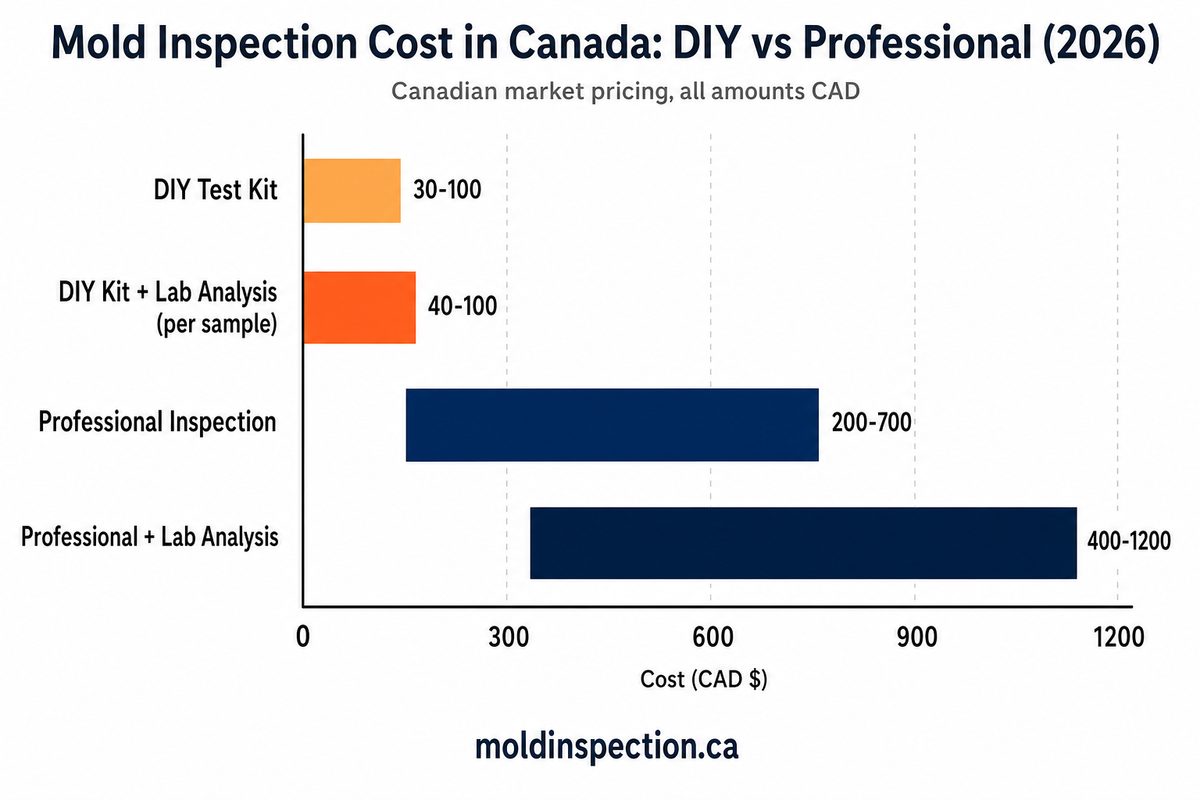
DIY is cheap. The hidden cost is your time and the false confidence a $30 swab kit can give you. Budget realistically for the supplies you actually need, not just the headline kit price.
| Inspection type | Price range (CAD) | What you get | Use case |
|---|---|---|---|
| DIY test kit (no lab) | $30 – $100 | Petri-dish or swab with at-home colour reading | Sanity check, not diagnostic |
| DIY kit + mail-in lab | $40 – $100 per sample | Species ID and spore count from a certified lab | Confirms presence; not legally admissible alone |
| Visual-only professional | $150 – $250 | Walk-through, moisture meter, written summary | Routine pre-purchase or post-leak triage |
| Standard professional | $200 – $700 | Visual + one air sample + lab analysis + report | Most real-estate, insurance, claim work |
| Professional + multi-sample | $400 – $1,200 | Visual + 2–4 samples (air, surface, ERMI) + species ID + protocol | Litigation, post-remediation clearance, severe cases |
Safety Equipment You Need Before Starting
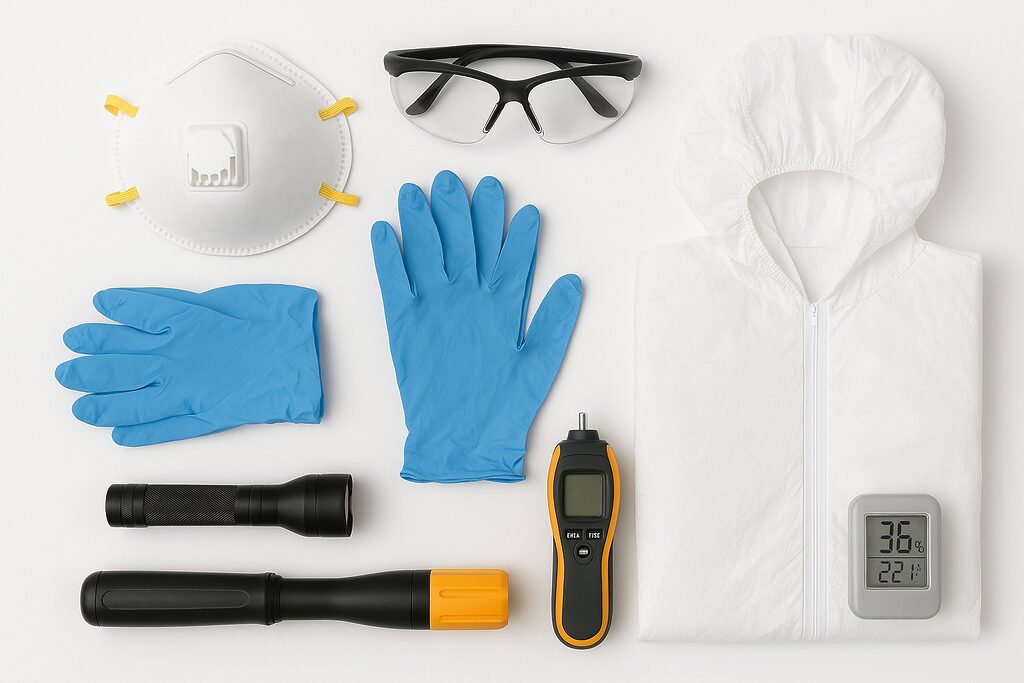
Mold spores are airborne. Disturbing visible growth releases millions of them. Every item below is non-negotiable for any inspection where you will physically touch mold or move material. Total cost is under $50.
N95 or P100 respirator
A surgical mask is not enough. N95 filters 95 percent of airborne particles down to 0.3 microns; mold spores are 2 to 100 microns. Available at any Canadian Tire or hardware store for $10 to $15.
Nitrile gloves
Disposable nitrile, not latex (some molds produce mycotoxins that pass through latex). Two pairs minimum so you can change halfway through. Around $15 for a box of 100.
Sealed safety goggles
Side shields or full-seal goggles. Open-frame safety glasses let spores reach the eye surface and tear ducts. About $8.
Disposable coverall
Tyvek-style with hood and elastic wrists and ankles. Stops spores from settling into clothing fibres you will track through the house. $10 to $18, single use.
Bright LED headlamp or flashlight
Mold hides in shadow — behind toilets, in attic eaves, in crawl spaces. A 500-lumen flashlight reveals stains that overhead lighting flattens out. $20 to $30.
Sealable plastic bags
Quart and gallon Ziplocs. Used PPE goes in a bag straight into the outdoor garbage when you finish. Never reuse single-use coveralls or N95s after contact with visible mold.
Two more items pay for themselves the first time you use them. A moisture meter ($25 to $60 — the pin-type Klein Tools ET140 is a Canadian Tire mainstay) catches dampness behind drywall you cannot see. A digital hygrometer ($12 to $20) tracks ambient humidity over days, not just one snapshot. Both belong in your toolbox permanently.
Step-by-Step Visual Mold Inspection Walkthrough
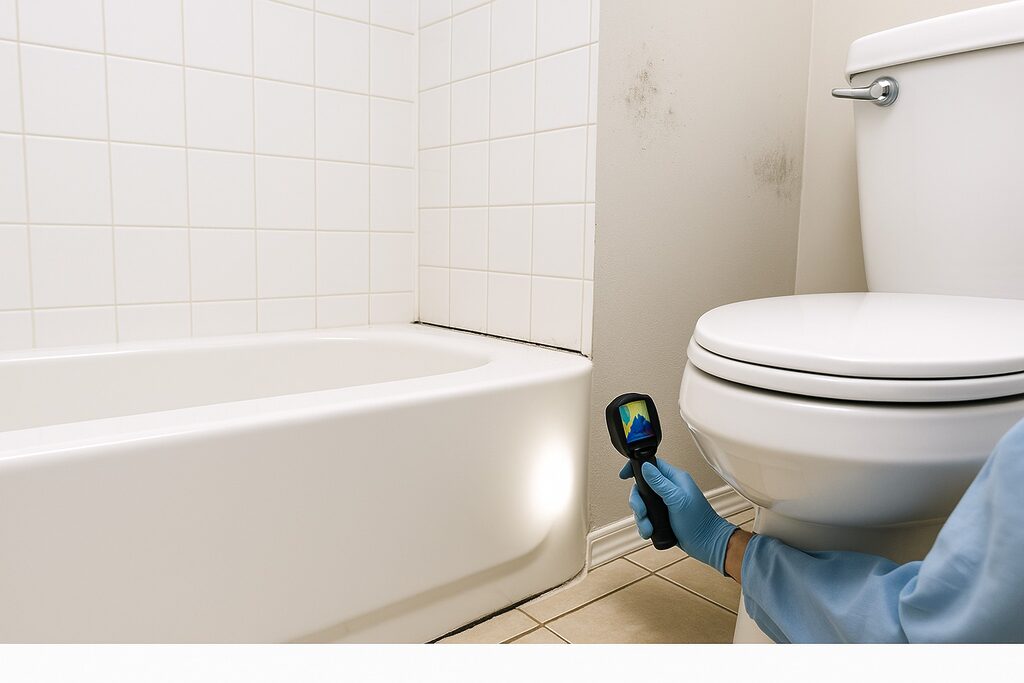
Work top-down through the house in the order spores actually travel: from leak sources at the top (roof, attic), through the structural envelope (walls, ceilings), down to the floors and basement where moisture pools. Document as you go. The point of the walkthrough is not to find every spore. It is to find every source of moisture, because mold is a moisture problem expressed visually.
Suit up and set the hygrometer
PPE on before you enter the inspection zone. Place the hygrometer in the room you will inspect first and let it stabilise for ten minutes while you do steps 2 and 3 elsewhere. Note ambient humidity at the start and end of the walkthrough — anything over 60 percent indoors is a mold-growth condition per Health Canada.
Inspect the attic and roof penetrations
Use the flashlight to scan the underside of the roof deck, especially around plumbing vents, bathroom-fan exhausts, and chimney chases. Look for dark staining, white fluffy growth, or black mold spotting on rafters. In Canadian attics the most common pattern is winter condensation from inadequate ventilation — dark stains in a halo around vent pipes are the signature. See our attic mold guide for the freshet vs condensation breakdown.
Walk the upper-floor ceilings and exterior walls
Stand under every light fixture and inspect the ceiling for staining, especially in rooms beneath bathrooms or beneath the attic. Run the back of a gloved hand along the top edge of exterior walls — cool spots indicate poor insulation that produces condensation in winter, and condensation is the most common hidden-mold source in Canadian homes.
Bathroom and kitchen deep check
Bathrooms produce the most mold per square foot in any house. Pull back the shower curtain and inspect the bottom seam of the surround. Get a flashlight on the grout between every tile, the caulk around the tub, behind the toilet tank (a frequent hidden-leak source), and under the sink trap. In the kitchen check under the sink, behind the dishwasher, around the fridge water line, and on the bottom of any range hood vent that exits through an exterior wall. The bathroom mold guide covers each of these in detail.
Bedrooms, closets, and main-floor living spaces
Closets on exterior walls trap moisture; move clothes aside and inspect the back wall and corners with the flashlight. Behind furniture pressed against exterior walls is another classic hiding spot. Look at window sills and frames — peeling paint and dark stripes along the bottom seal indicate ongoing condensation. Check around any past water-damage spots, even ones that look fully dry.
Basement and crawl space
This is where 60 to 70 percent of Canadian residential mold lives. Inspect the wall-to-floor cove around the entire perimeter (efflorescence and white powder indicate water intrusion). Check behind any stored boxes against exterior walls, around the sump pump, behind the water heater and furnace, and at any below-grade penetration (gas line, electrical service, drain stack). Open the crawl-space hatch if you have one and inspect the joists for staining. See our basement mold deep-dive for what each pattern means.
HVAC system check
Pull the furnace filter and inspect it — black streaks on the upstream side mean mold somewhere in the return ductwork. Open the air-handler cabinet (power off) and look at the evaporator coil and drain pan with the flashlight. Standing water in the pan or biofilm on the coil is a guaranteed contamination source. Most homeowners cannot inspect ductwork interior without a borescope; this is a stop-and-call-a-pro point if the filter or coil shows growth.
Final humidity reading and photo pass
Note the hygrometer’s ambient and peak readings. Walk back through every flagged area with your phone and photograph each one with a coin or ruler in frame for scale. Photograph from multiple angles. Note the room, time, and any moisture-meter reading you took. This is the documentation that lets you make a decision the next day with a clear head.
The 4 DIY Mold Testing Methods Explained
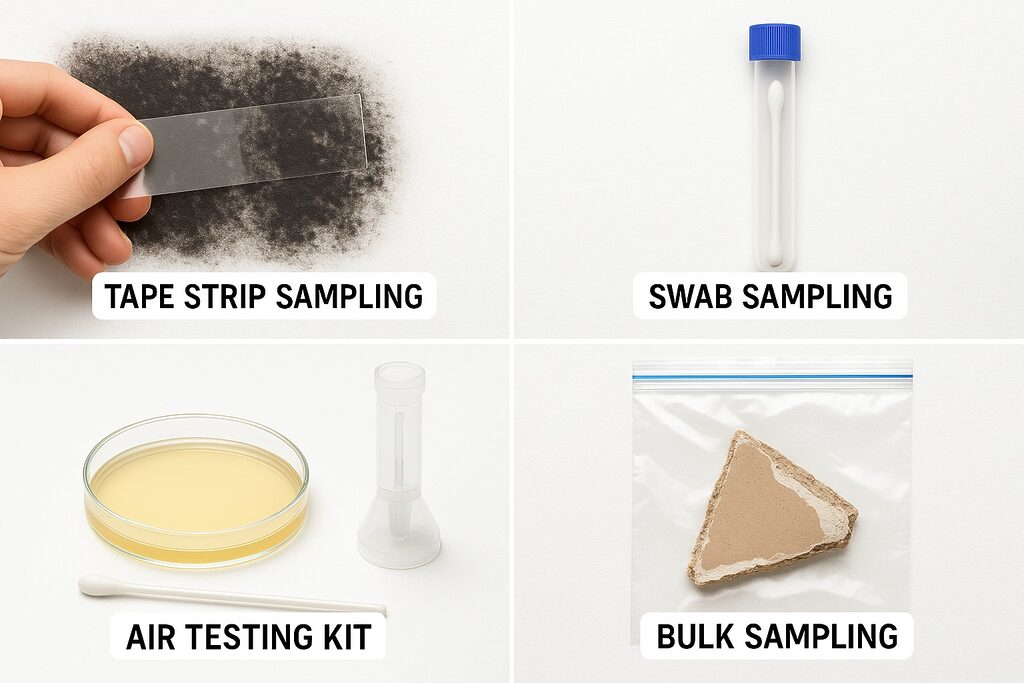
If the walkthrough flagged something and you want a lab result before deciding what to do next, pick the sampling method that matches the surface. Mixing methods muddles the data; pick one per area.
Tape-lift sampling
Use for: Visible growth on hard, flat surfaces (drywall, painted wood, tile grout). Press a clear adhesive strip against the surface, peel, mount on a microscope slide, mail to lab. Around $40 per sample. Lab returns species and density. Fastest turnaround (3–5 days).
Swab sampling
Use for: Grouted surfaces, corners, irregular textures where a tape lift won’t seat flat. Sterile cotton swab rubbed firmly over a 4-by-4 cm area, sealed in a culture tube. Around $50 per sample. Same species report as tape-lift; better for porous surfaces.
Air sampling (petri-dish kit)
Use for: Suspected hidden mold or musty smell with no visible source. Open dish for one hour in the suspect room and one outdoor control. Mail both to the lab. $50–$100. Reports spores per cubic metre vs the outdoor baseline. Indoor over outdoor is the warning signal.
Bulk material sampling
Use for: Suspect material you can cut a small piece from — a chunk of drywall, a piece of carpet pad, a wood-trim sliver. Cut, bag, label, mail. $60–$100 per sample. Confirms whether the material itself is contaminated through its thickness, not just on the surface.
None of these are legally admissible standing alone. The lab returns a number; what it means in context — comparison to outdoor baseline, contamination pattern, remediation protocol — is the inspector’s job. If you need the result to mean something to an insurance adjuster, a buyer’s lawyer, or the Landlord and Tenant Board, get a certified inspector to take the sample. See how professional air sampling differs from a DIY petri kit for the chain-of-custody specifics.
Using a Moisture Meter to Find Hidden Mold
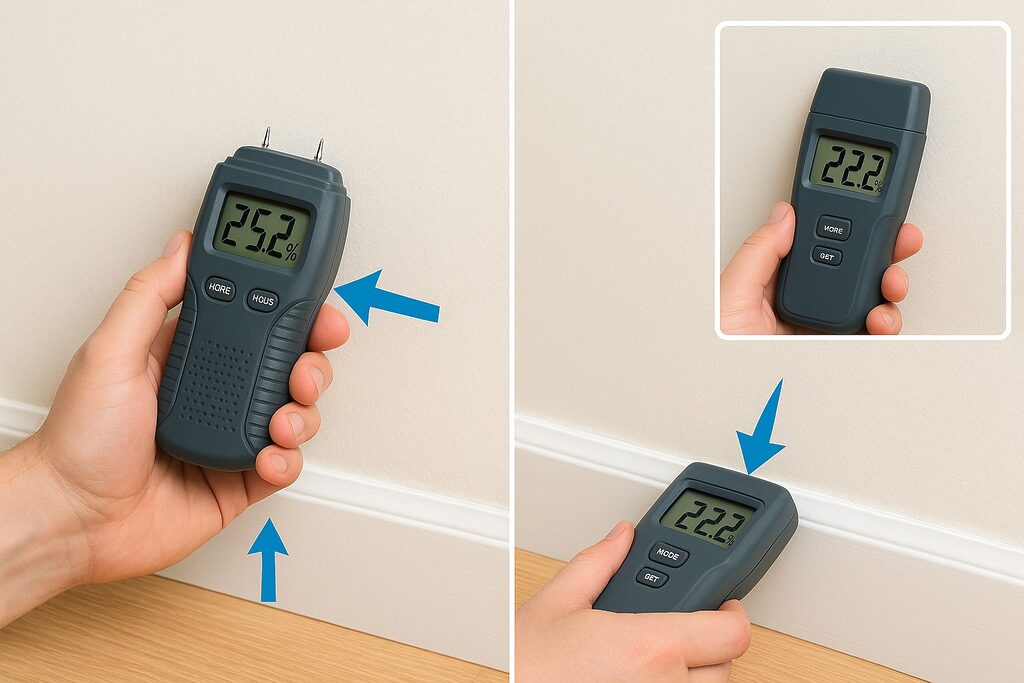
The moisture meter is the single most useful $30 tool a homeowner can own. Visible mold is the symptom; moisture is the cause. A meter finds the cause before the symptom appears.
Pinless capacitance meters read through the surface without penetration — good for finished walls and floors you don’t want to damage. Pin-type meters drive two small needles into the material — slightly more accurate, leaves two pin holes the size of a stapled receipt. For a homeowner, pinless first, pin-type when you need confirmation.
Run the meter along every surface flagged in the walkthrough, plus a baseline reading on a known-dry interior wall as a comparison. A reading 5 percent higher than baseline on the same material in the same room is suspicious even if it’s under the mold-growth threshold — moisture levels are not static, and a high reading in dry weather means a much higher reading after the next rain.
When DIY Stops and a Pro Must Take Over
Yellow — Consider professional involvement
Visible mold over five square feet but under ten. Musty smell that comes and goes. Multiple flagged areas spread across two or more rooms. Single hidden source you can identify but not access. Recent renovation work, especially after water damage older than your memory.
Orange — Book a professional inspection
Visible mold over ten square feet in any one area (Health Canada threshold). Persistent musty smell with no visible source. Mold inside walls you confirmed with a moisture meter or borescope. Water damage from a known source older than 48 hours. Recurring growth in a spot you have already cleaned. Anyone in the home with asthma, allergies, or COPD reports symptoms that worsen at home and improve away from it.
Red — Vacate the area and call immediately
Visible mold over thirty square feet or covering entire wall sections. Black or dark green mold growing on drywall after sewage or flood water exposure. Mold in HVAC ductwork being actively circulated. Mold in a home with an infant, an immunocompromised resident, or someone undergoing chemotherapy. Multiple rooms affected simultaneously. Close interior doors to the affected area, run the HVAC on circulation only if you must, and get an inspection scheduled within 48 hours.
Canadian Regional Considerations
Canadian mold patterns vary by climate and housing stock. Where you live changes both what you’ll find and where you’ll find it.
- Ontario.
- Older Toronto and Ottawa housing stock pre-1980 has poor exterior-wall vapour barriers; condensation behind drywall in north-facing rooms is the dominant pattern. Spring-thaw basement seepage is the second most common source — the Ottawa River freshet drives an annual basement-mold cycle from late March through May. Inspections in Ontario should weight basement and exterior-wall coverage heavily.
- Quebec.
- Montreal’s pierre-grise foundation stock (limestone or concrete-block basements pre-1960) is porous by design; expect efflorescence and rising damp at the wall-to-floor cove rather than discrete leaks. Quebec building code accepted vapour-permeable wall assemblies for longer than the rest of Canada, so interior-wall condensation patterns differ. Health Canada residential indoor air quality guideline applies nationally, but Quebec-specific resources from Régie du logement (now TAL) classify mould as a serious habitability defect.
- British Columbia.
- The wet-coast climate puts every Lower Mainland home in a different inspection category — annual ambient humidity over 75 percent for months at a time means visible mold develops on any cold surface left undisturbed. Inspections should emphasise air sampling more heavily than in drier provinces. CMHC Moisture and Air publishes the regional moisture-source data Vancouver, Victoria, and Nanaimo homeowners need.
- Prairies (Alberta, Saskatchewan, Manitoba).
- Cold, dry winters with heated interiors produce extreme indoor-to-outdoor vapour drives. The mold risk shifts from chronic dampness to acute condensation around windows, exterior wall plates, and any thermal bridge. US EPA Mold Course covers the underlying building science applicable here.
- Atlantic Canada.
- Wind-driven rain on exterior walls, basement floor moisture in coastal homes built on damp lots, and frequent freeze-thaw cycles in spring all produce a pattern closer to BC than to Ontario despite the cooler annual temperatures.
How to Document Your DIY Findings
Documentation is the only part of the inspection that survives the moment. Whether you ultimately fix the problem yourself or call a pro, the notes and photos you take during the DIY walkthrough are the highest-value artifact you produce. Treat them like a deposition.
Photograph everything you flagged
Two shots per spot: a wide shot showing the location in context (which room, which wall, what’s around it), and a close-up with a coin or measuring tape in frame for scale. Phone photos with location metadata are sufficient; you don’t need a real camera. Date stamp each photo by enabling timestamp overlay or by including a phone screen showing the date.
Write a one-line entry per area
For each flagged area, write: room, surface (drywall / tile / wood / concrete), approximate size in square feet, colour (black / green / white / grey / pink), moisture-meter reading, and one sentence on suspected source. A spreadsheet works; so does a notes-app document. The goal is to be able to walk a professional or insurance adjuster to each area in under five minutes.
Save lab results with the photos
If you sent samples to a lab, the PDF result goes in the same folder as the photos for that area. Many DIY-friendly Canadian labs (EMSL, Mold Inspection Sciences Canada) email a PDF report you can save and forward. Cross-reference the sample number in your photo notes so a professional can map your lab data to your visual findings without re-asking you.
Note dates and weather
Record the date of the inspection, recent rainfall (Environment Canada historical data is free), and any plumbing or appliance events in the past 30 days. Moisture readings are weather-dependent; a borderline reading in dry July is a very different number than the same reading in February. See our guide to mold inspection reports for how professionals structure the documentation you’re building toward.
Frequently Asked Questions
What is the best DIY mold test kit for Canadian homes?
For most homeowners, a tape-lift kit with mail-in lab analysis from a Canadian lab is the highest signal per dollar — about $40 to $50 per sample, species ID returned within five business days. Pure DIY kits that read at home with no lab (the petri-dish-only ones) tell you mold is present, which you already knew if you bought the kit. They don’t tell you which mold or how much. Skip those and pay the $40 for actual lab work.
How accurate are DIY mold tests?
DIY tests are accurate at the molecular level — a lab reading the sample sees the same spores a professional sample contains. What DIY tests miss is sampling representativeness. A homeowner taking one petri-dish sample for one hour in one room captures one slice of one day’s air. A certified inspector takes multiple samples in multiple rooms with an outdoor control, on a calibrated pump pulling a known volume of air. The lab result is equally accurate; the inspection itself is not.
How much does a DIY mold test cost in Canada?
A bare-bones DIY mold kit costs $30 to $50 and gives you a petri-dish reading at home. A kit plus lab analysis costs $40 to $100 per sample. Most homeowners spend $80 to $120 total for a meaningful DIY inspection: one or two lab samples plus supplies (PPE, moisture meter, hygrometer). For comparison, a standard professional inspection runs $200 to $700 in Canada and produces a written report. See the cost guide cross-linked above for the full picture.
Can I do a mold inspection without testing?
Yes, and most DIY inspections are visual-only. If you can see the mold and identify the moisture source, no testing is needed — Health Canada’s position is that any visible mold should be cleaned regardless of species. Testing only adds value when you suspect hidden mold, when you need legally defensible documentation, or when you need to confirm whether a previously remediated area is now clean. For a simple bathroom-corner job, skip the test, clean the mold, and fix the moisture.
How do I test for mold inside walls without cutting them open?
Three indirect methods work. A moisture meter on the wall surface identifies wet drywall, which strongly implies mold growth where it has been wet for over 48 hours. A thermal-imaging camera or even a smartphone thermal attachment (FLIR One, around $250) reveals cold spots that correspond to wet insulation. An air-sample petri kit in the room over an hour, compared to an outdoor control, will show elevated spore counts if mold is growing inside the wall and venting through outlet boxes or wall penetrations. If all three flag the same wall, you have your answer without cutting it open.
Do I need to test for mold species at home?
Almost never. Health Canada explicitly states that species identification is not needed to decide whether mold should be cleaned — the answer is always yes. Species ID only matters in two scenarios: when a doctor is investigating a specific allergic response and needs to know the trigger, and when you are confirming or ruling out Stachybotrys chartarum (the toxic black mold) for legal or insurance documentation. For routine home inspections, save the species-ID money and put it toward fixing the moisture source.
How long does a DIY mold inspection take?
For a typical 1,500-square-foot Canadian home, budget two hours for the walkthrough, plus another 30 minutes if you are taking samples. Adding the basement and crawl space pushes the total to three hours. The most common DIY mistake is rushing — a 30-minute walkthrough is not an inspection, it’s a glance. If you don’t have three hours, do one floor today and one floor next weekend rather than skipping coverage to fit a single session.
When should I stop DIY and hire a professional inspector?
Stop the moment you find any of these: visible mold over ten square feet, a musty smell with no visible source, mold inside walls confirmed by moisture readings, water damage older than 48 hours affecting drywall or insulation, recurring mold in a spot you’ve already cleaned, or any respiratory symptoms in the home that worsen indoors. Beyond those thresholds DIY becomes net negative — you risk disturbing contamination, voiding insurance coverage, and missing what a moisture meter alone can’t tell you. The $300 professional inspection is the cheapest part of any mold problem above the DIY line.
Related Mold Resources
Serving Ontario and Quebec — Montreal, Ottawa, Gatineau, Kingston, Cornwall, Belleville, Brockville. Free virtual mold inspections available.