Bathroom Mold: Causes, Removal & Prevention
Bathroom mold is the fuzzy, discoloured growth that appears on ceilings, grout, caulking, and tile after repeated exposure to moisture and poor ventilation. Most bathroom mold is not immediately dangerous, but it signals a moisture problem that will spread if you ignore it. This guide walks through identification, safe removal, and prevention, based on what our certified inspectors have found in more than fifteen years of Canadian bathroom assessments.
Why Bathroom Mold Keeps Coming Back
Bathroom mold keeps returning because most homeowners treat the visible patch and leave the moisture source untouched. Mold spores are always in the air. What they need to grow is water, a food source (soap scum, paper, drywall, grout), and stagnant air above 60% humidity. Every shower and bath delivers all three in under ten minutes.
Three patterns account for most recurring bathroom mold our inspectors document:
- Inadequate exhaust ventilation. A weak fan, a fan vented into the attic instead of outside, or a fan that runs only during the shower lets humid air settle on cold surfaces. Health Canada’s guide on addressing mould in your home repeatedly ties indoor mould to ventilation gaps.
- Hidden leaks. Slow leaks behind a tub spout, under a vanity, or at a failing wax ring keep drywall and subfloor wet long after you finish drying the visible surfaces.
- Condensation on cold surfaces. Ceilings directly under an uninsulated attic, outside walls, and window frames are cold in winter. Warm bathroom air hits them, water condenses, mold follows.
In our experience, surface cleaning fails because none of these root causes goes away with a bleach spray. A spore-free surface meets the same wet conditions and regrows within two to six weeks. For broader context on where bathroom moisture sits in a home’s overall mold risk, review our guide on the signs of mold in homes.
How to Identify Bathroom Mold
Bathroom mold is not always black, and not every dark patch is mold. Correct identification decides whether you can clean it yourself or need a professional assessment. The five types below cover more than ninety percent of what we find in Canadian bathrooms.
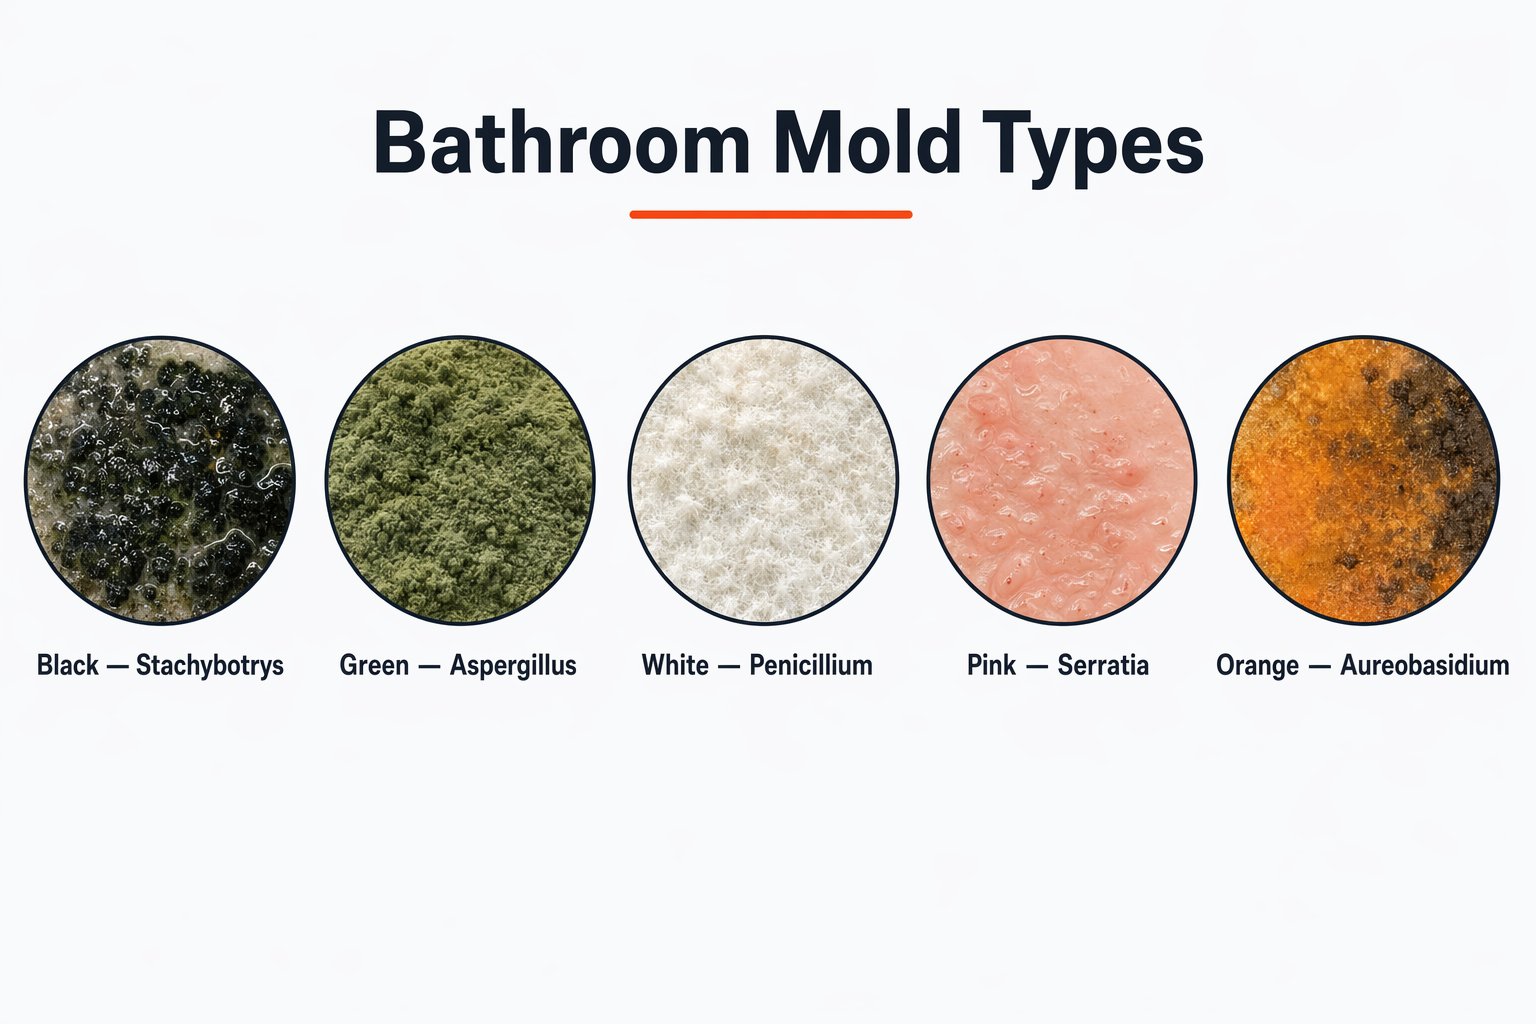
Black — Stachybotrys & Cladosporium
Slimy or wet-looking, dark green-black, musty smell. Stachybotrys needs prolonged saturation of drywall or wood. Cladosporium is drier and much more common. See health risks of black mold.
Green — Aspergillus & Penicillium
Powdery or velvety, pale sage to deep forest green. Favours grout lines, silicone caulk, cold corners. Most small patches respond to vinegar or commercial mold cleaner.
White — Penicillium or Efflorescence
Fuzzy growth is Penicillium. Chalky dry crust is mineral efflorescence, not mold. Mold grows back after wiping; efflorescence does not.
Pink — Serratia marcescens
Not mold — a bacterium. Salmon-pink rings in toilet bowls, shower doors, grout near drains. Signals biofilm and standing moisture. Per the CDC’s overview of mold and dampness, it can affect immunocompromised people.
Orange — Aureobasidium
Rust-orange starting, darkens to brown-black with age. Common near aging caulk and drain edges. Surface organism, easy to clean, indicates caulk is absorbing water.
For a broader catalogue of species, see our guide on common household mold types.
Bathroom Mold vs Mildew — How to Tell the Difference
Bathroom mold and mildew are often used interchangeably, but they behave differently and need slightly different responses. Mildew is a surface fungus: flat, grey-white or pale yellow, and it wipes away with a household cleaner. Mold is the broader category, grows in three dimensions, penetrates porous materials, and returns after surface cleaning if moisture is present. If your “mildew” is raised, fuzzy, or darker than grey, it is probably mold.

Mildew
- Flat, powdery texture
- Grey, white, or pale yellow
- Stays on the surface
- Mild, slightly stale smell
- Wipes off with household cleaner
- Cosmetic staining only
- Low health risk
Mold
- Fuzzy, raised, sometimes slimy
- Black, green, red, pink, or orange
- Penetrates grout, drywall, wood
- Strong, earthy, musty smell
- Returns within weeks if moisture persists
- Structural damage over time
- Allergic, respiratory, immune reactions
The practical rule: if a surface cleaner removes the growth and it stays gone for more than a month, it was mildew. If it comes back, treat the underlying moisture before cleaning again.
Mold on Bathroom Ceiling
Mold on a bathroom ceiling — also searched as bathroom ceiling mold — forms because hot shower air condenses on the coldest surface in the room. Your ceiling is usually that surface, especially under an uninsulated attic or at the junction where the ceiling meets an outside wall. In our inspections across Ottawa, Montreal, and Gatineau, ceiling mold is the single most common bathroom finding, and it is almost always solvable without demolition if caught early.

Why Ceiling Mold Happens
Four factors combine to produce ceiling mold:
- Inadequate exhaust. A builder-grade fan rated at 50 cubic feet per minute is too weak for a typical 40 to 60 square foot bathroom. Health Canada recommends sizing the fan to fully change the air at least eight times per hour, and running it for 20 to 30 minutes after every shower.
- Cold ceiling surface. Uninsulated attic space above the bathroom lets the ceiling drywall stay cold year-round. In winter, the temperature difference creates an immediate condensation surface.
- Fan venting into the attic. A shockingly common defect: the exhaust duct ends in the attic instead of through the roof or soffit. You are moving the moisture from the bathroom to a hidden space where it condenses on framing and produces attic mold. If you see ceiling mold and have not checked your attic, check it. Our attic mold guide covers the warning signs.
- Roof or flashing leak. Ceiling mold concentrated in one spot — especially with a brown ring — usually means a slow leak from above, not condensation.
How to Remove Ceiling Mold Safely
Ceiling mold is harder to clean than wall or grout mold because you are working overhead, which means solution drips onto your face, forearms, and eyes. Prepare for that.
- Put on N95 respirator, safety goggles (not glasses), long sleeves, and nitrile gloves. Never use a regular dust mask — it will not filter spores.
- Set up a stable step stool or short ladder. Do not stand on the edge of a tub.
- Lay an old towel over the floor to catch drips.
- Spray undiluted white vinegar on the affected area. Let it sit for one hour. Vinegar penetrates porous surfaces better than bleach, which stays on the surface.
- Scrub gently with a soft sponge. Aggressive scrubbing releases spores into the air.
- Wipe clean with a microfibre cloth. Let the area dry completely.
- Apply a mold-resistant primer (Zinsser Perma-White or equivalent) once dry, then finish with a bathroom paint rated for high humidity.
Skip this if the mold patch is larger than ten square feet, if the drywall is sagging, or if it returns within weeks. At that point, you are cleaning a symptom while the drywall paper rots behind the paint.
When Ceiling Mold Signals a Bigger Problem
A small patch in the corner above the shower is usually condensation. A stain that grows, discolours, or sags means water is arriving from above. Check the attic for wet insulation, stained rafters, or daylight coming through the roof deck. Roof leaks often appear in the bathroom first because the bathroom is frequently in an interior corner of the house where roof valleys collect water. Do not paint over a growing stain — find the leak first.
Shower & Tile Mold
Shower mold grows fastest on silicone caulk, inside grout lines, and at the bottom edge of tile where water pools. The same three-condition rule applies: moisture, food source, stagnant air. Showers supply all three many times per week. For small jobs, a paste of baking soda and white vinegar applied for ten minutes, then scrubbed with a grout brush, handles most cases.
For recurring shower mold, pink shower-floor rings, orange caulk growth, or mold that keeps returning after cleaning, our dedicated Shower Mold Removal Guide goes deeper into shower-specific causes, products, and step-by-step removal.
Grout & Caulking Mold
Grout and caulking are the two most mold-prone surfaces in any bathroom because they are porous, they stay wet, and they collect soap residue that feeds fungal growth.
Why Grout and Caulk Grow Mold
Cement-based grout is porous until it is sealed, and almost no residential bathroom has its grout resealed every year the way manufacturers recommend. Once water soaks into unsealed grout, it stays there long enough for mold to colonize below the surface, where cleaners cannot reach. Silicone and acrylic caulk start mold-resistant but lose that protection within 12 to 24 months as soap scum builds a biofilm the mold can feed on.
Cleaning vs Replacing — A Simple Rule
Clean it if the mold is on the surface, the grout or caulk is intact, and a soft brush with hydrogen peroxide lifts the stain completely. Replace it if the mold is visible through the material, if the caulk is cracked or pulling away from the tile, or if the mold returns within a month of cleaning.
Replacement is cheaper and more effective than repeated cleaning of failed caulking.
Re-Caulking Basics
Remove the old caulk completely with a plastic caulk tool — avoid metal scrapers that scratch the tile. Clean the joint with rubbing alcohol and let it fully dry (at least 24 hours if the shower has been in use). Apply a 100% silicone caulk labelled for kitchens and bathrooms, pulling a smooth bead in one motion. Skip the “caulk refresher” products that layer over old caulk — they trap moisture and create the exact biofilm you are trying to remove.
Black Mold in the Bathroom
Black mold in the bathroom is a legitimate concern, but the panic around “toxic black mold bathroom” warnings online is often overstated. Health Canada states plainly that all indoor mould should be removed regardless of species, and that lab identification is usually unnecessary for cleanup decisions. That said, black mold in a bathroom tells you three things:
- Moisture has been present for weeks, not days.
- A cellulose food source (drywall paper, wallpaper, ceiling tile) is likely saturated.
- Standard surface cleaning will not be enough if the source is hidden behind the wall.
Bathroom-specific triggers for black mold include a slow plumbing leak behind the vanity or tub, chronic ceiling condensation under an uninsulated attic, and black mold on window frames where winter condensation soaks the wood sill. Cleaning is possible for contained patches under ten square feet, but anything larger — or anything behind a wall, under a floor, or in the ceiling above a leak — belongs in the hands of a professional remediation team. For symptom-specific details and what qualifies as medically significant exposure, see our detailed page on the health risks of black mold.
Health Risks from Bathroom Mold Exposure
Most people exposed to bathroom mold experience no symptoms. A meaningful minority — especially those with asthma, allergies, a weakened immune system, or lung conditions — experience reactions that range from mildly annoying to serious. The EPA’s Brief Guide to Mold, Moisture and Your Home is a sensible reference for the general picture.
The common symptoms our clients report before inspection are:
- Chronic cough or throat irritation worse at home, better at work
- Morning sinus congestion that clears after leaving the house
- Itchy eyes and skin, especially after a shower
- Worsening asthma or new wheeze
- Unexplained fatigue and headaches in heavy exposure cases
High-risk groups deserve faster action. Infants, seniors, pregnant women, people undergoing cancer treatment, and anyone with chronic lung disease should not attempt large-area mold cleanup themselves. For depth on symptoms and medical signals, our page on the health risks of mold exposure goes further.
If you notice bleeding or severe respiratory distress, leave the environment and contact a physician before returning. This is rare, but it is documented in cases of severe indoor mould exposure.
How to Remove Bathroom Mold Safely — Step-by-Step
The safe approach depends on how much mold you are dealing with. Anything under ten square feet (roughly a 3-foot by 3-foot patch) is typically a do-it-yourself job. Anything larger is professional work by every Canadian and US authority we follow.

What You Need
- N95 respirator (minimum) — not a surgical or cloth mask
- Sealed safety goggles
- Nitrile gloves, long sleeves, long pants
- Old clothes you can launder hot or discard
- White vinegar OR 3% hydrogen peroxide OR a commercial mold cleaner
- Soft scrub brush and microfibre cloths
- Plastic garbage bags for disposing contaminated materials
- Fan or open window for ventilation during cleaning
Avoid bleach on porous surfaces. Bleach sanitizes the surface but the water carries living spores deeper into grout, drywall, and wood. Vinegar and hydrogen peroxide penetrate the substrate and handle those roots better.
Small Area Cleanup (Under 10 Square Feet)
- Ventilate. Open the bathroom window and run the exhaust fan. Close the bathroom door to keep spores contained.
- Protect yourself. Put on the respirator, goggles, and gloves before you enter the space.
- Spray, do not mist. Saturate the mold area with white vinegar or a 3% hydrogen peroxide solution. Let it sit for one full hour.
- Scrub gently. A soft brush works better than aggressive scrubbing, which aerosolizes spores.
- Rinse and dry. Wipe with a damp microfibre cloth, then dry thoroughly. Any residual moisture invites regrowth.
- Dispose of materials. Seal cleaning cloths and any contaminated porous materials (old caulking, stained towels) in a plastic bag before leaving the bathroom.
- Address the moisture. Extend exhaust fan runtime, install a bathroom dehumidifier, or schedule a leak repair. Without this step, the mold returns.
Large Area or Recurring Mold (Over 10 Square Feet)
Stop and call a professional. Canadian and US health agencies, including the EPA and Health Canada, advise professional remediation for mold covering more than about ten contiguous square feet, for mold in HVAC systems, and for any situation where sewage or contaminated water was involved. At this scale, spore containment and source repair matter more than cleaning. Our mold removal service follows IICRC S520 standards for containment, HEPA filtration, and antimicrobial treatment. For budgeting, the mold remediation cost guide for Canadian homeowners covers typical price ranges by scope.
Bleach vs Vinegar vs Hydrogen Peroxide vs Borax
| Solution | Best for | Weakness |
|---|---|---|
| White vinegar (undiluted) | Porous surfaces, grout, caulking, ceilings | Strong smell; takes 1 hour to work |
| Hydrogen peroxide (3%) | Bathroom surfaces, tile, coloured grout | Light bleaching of some dyes |
| Baking soda paste | Stain lift, gentle mechanical cleanup | Does not kill mold on its own — pair with vinegar |
| Borax solution | Larger DIY patches, wood framing | Toxic if ingested; keep from pets and kids |
| Chlorine bleach | Non-porous surfaces only (glass, sealed tile) | Water carries spores deeper into porous grout and drywall |
How to Prevent Bathroom Mold
Prevention is the cheapest mold removal strategy you will ever deploy. Nearly all recurring bathroom mold disappears when ventilation, humidity, and materials are brought into line.

Ventilation
Run the exhaust fan during the shower and for a full 20 to 30 minutes after. Confirm the fan actually vents outside — not into the attic or soffit cavity. If your fan is older than ten years or rated under 80 cubic feet per minute for a typical bathroom, replace it. A modern humidity-sensing fan that runs automatically solves the human-memory problem.
Humidity
Keep bathroom humidity between 30 and 50 percent. A 15-dollar hygrometer tells you where you stand. Above 60% for more than a few hours per day is the threshold where mold colonizes new surfaces. A small dehumidifier in basement bathrooms or ensuites without windows pays for itself in one avoided remediation.
Daily, Weekly, and Monthly Habits
- Daily. Squeegee shower walls and glass after use. It sounds tedious; it takes 30 seconds and removes the water mold needs.
- Weekly. Wipe down grout, caulking, and corners with a vinegar spray.
- Monthly. Clean the exhaust fan grille and cover. A dust-caked fan grille moves almost no air.
- Annually. Inspect and, if needed, reseal cement grout. Replace any silicone caulk showing discolouration or gaps.
Materials
During any renovation, specify mold-resistant drywall (often called “green board” or “purple board”) in bathroom walls and ceilings, a mildew-resistant bathroom paint rated for high-moisture rooms, and 100% silicone caulk at every tile-to-tub and tile-to-counter joint. These upgrades add very little to the cost of a project and remove most of the materials-side risk for a decade or more.
When Should You Call a Professional?
A useful severity framework divides bathroom mold cases into three levels.
Level 1 — Minor
Under three square feet. Surface mold on grout, caulking, or a single ceiling corner. No staining through drywall. No persistent smell. Handle this yourself with the small-area protocol above.
Level 2 — Moderate
Three to ten square feet. Noticeable patch, recurring after cleaning, or paired with a musty smell. Safe for a cautious homeowner with full PPE, but also a reasonable point to bring in a professional inspector.
Level 3 — Extensive
Over ten square feet. Visible on multiple surfaces, behind peeling paint, on sagging drywall, or paired with air-quality complaints. Stop cleaning. Call for a professional mold inspection to design a remediation plan.
Additional signs it is time to call regardless of size:
- Mold returning within 30 days of cleaning
- A musty smell with no visible mold (hidden mold is a real scenario)
- Multiple household members reporting allergy or asthma symptoms
- Recent water damage, burst pipe, or unresolved roof leak
- Pregnancy, infants, or immunocompromised residents in the home
At Level 3, start with a professional mold inspection to map the contamination before remediation.
Mold Inspection Canada — Trusted Help for Bathroom Mold
Mold Inspection Canada has served Ontario and Quebec homeowners for more than fifteen years. Our inspectors hold NORMI, InterNACHI, IICRC, and NAMP certifications, and our reports are designed for both homeowner understanding and real-estate transaction documentation. We serve Ottawa, Kingston, Cornwall, Belleville, Brockville, Kanata, Carleton Place, Montreal, Gatineau, and Laval.
If you are unsure whether your bathroom situation needs a professional, our free virtual mold inspection gives you a certified opinion in a 15-minute video call. You walk through the bathroom with your phone, we see what you see, and you leave with a clear recommendation — DIY, air testing, or full inspection. There is no cost and no obligation. We also match any competitor quote through our price match guarantee and support clients around the clock.
Frequently Asked Questions
Is mold in the bathroom harmful?
Most bathroom mold is not acutely harmful for healthy adults, but prolonged exposure causes respiratory irritation and allergic reactions in sensitive people. Infants, seniors, asthmatics, and immunocompromised individuals are at higher risk. Anything larger than a few square feet, any mold paired with a strong musty smell, or any mold in a home with respiratory patients deserves prompt cleanup and attention to the moisture source.
How do you get rid of mold on a bathroom ceiling?
Spray undiluted white vinegar, let it sit one hour, then gently scrub with a soft brush while wearing an N95 respirator, goggles, and gloves. Wipe clean, let the ceiling dry completely, then seal with a mold-resistant primer and bathroom paint. Run the exhaust fan 20 to 30 minutes after every shower. If the stain returns, check the attic for a roof leak or an exhaust fan that vents into the attic instead of outside.
Why does mold keep coming back in my bathroom?
Mold returns because the moisture source is still active. Surface cleaning removes visible growth but does nothing about inadequate ventilation, hidden leaks, cold-surface condensation, or biofilm deep in porous grout. The three most common root causes we find are an undersized or poorly vented exhaust fan, unsealed cement grout, and a slow plumbing leak behind a tub or vanity. Fix the moisture before the next cleanup.
Does bleach actually kill bathroom mold?
Bleach kills mold on non-porous surfaces like glass, sealed ceramic tile, and metal fixtures. On porous surfaces like grout, caulking, drywall, and wood, bleach only sanitizes the surface while the water carries living mold deeper into the material. For those, vinegar or 3% hydrogen peroxide works better because they penetrate the substrate.
How much does bathroom mold removal cost in Canada?
A small DIY cleanup costs under $50 in supplies. A professional inspection in Ontario or Quebec typically ranges from $250 to $500 depending on scope. Full remediation for moderate bathroom contamination ranges from $600 to $2,500, and larger cases involving demolition and drywall replacement can reach $5,000. Our mold remediation cost guide for Canadian homeowners has detailed pricing.
When should I call a professional for bathroom mold?
Call a professional when the affected area exceeds ten square feet, when the mold returns within 30 days of cleaning, when you smell mustiness without seeing mold, when mold appears on sagging or stained drywall, or when anyone in the home has asthma or a weakened immune system. Large or hidden mold requires containment and HEPA filtration to avoid spreading spores.
Is pink mold in the bathroom dangerous?
Pink mold is technically not a mold — it’s a bacterium called Serratia marcescens that grows on soap residue in warm, wet bathroom surfaces. It’s not dangerous for most healthy people, but it can cause urinary tract, respiratory, and wound infections in immunocompromised individuals. Clean with a bathroom disinfectant and reduce soap residue by rinsing the shower and toilet regularly.
Related Guides
Bathroom mold rarely exists in isolation. If you are finding growth in one room, other moisture-prone areas often need a look as well.